
The Ultimate Guide to Mac Restoration: From Cracked Retina Displays to Complex Logic Board Micro-Soldering
For creative professionals, developers, students, and everyday users, a MacBook is far more than just a laptop; it is the central hub of productivity and digital life. Apple’s engineering is renowned for its sleek design and reliable performance, but when disaster strikes—whether it’s a closed lid on a rogue pen or a spilled cup of coffee—the resulting downtime is devastating. If you find yourself frantically typing “Macbook screen replacement near me” into a search engine, or facing the terrifying prospect of needing a complete macbook board repair, this comprehensive guide is your roadmap to getting your digital life back on track.
In this deep dive, we will demystify the repair process for Apple’s flagship laptops. We will explore the anatomy of a Retina display, explain why local, specialized repair shops are often superior to mailing your laptop away, and pull back the curtain on the highly complex, microscopic world of logic board rehabilitation. By understanding the mechanics of your machine, you can make informed decisions that save your data, your device, and your wallet.
The Display Dilemma: Decoding the “MacBook Screen Replacement Near Me” Search
The display is the window to your MacBook’s soul. Apple’s Retina and Liquid Retina XDR displays are marvels of optical engineering, boasting incredible color accuracy, brightness, and resolution. Unfortunately, they are also incredibly fragile. Unlike older laptops where the LCD panel was protected by a thick bezel and a sheet of protective glass, modern MacBooks fuse the LCD panel directly to the incredibly thin aluminum lid.
Common Causes of MacBook Screen Failure
- Point-Impact Fractures: Leaving a small object (a staple, a webcam cover, a headphone jack) on the keyboard and closing the lid is the number one cause of cracked MacBook screens.
- Flexgate: Specifically affecting certain MacBook Pro models, this occurs when the delicate flex cables connecting the display to the logic board wear out over time, causing a “stage light” effect at the bottom of the screen or complete failure when opened past a certain angle. Apple has acknowledged this issue on specific models.
- Delamination (Staingate): The anti-reflective coating on older Retina models peeling away, making the screen look permanently dirty or scratched.
- Vertical Lines or Color Banding: Often indicative of a failing T-CON (timing controller) board or physical damage to the delicate ribbon cables at the base of the LCD panel.
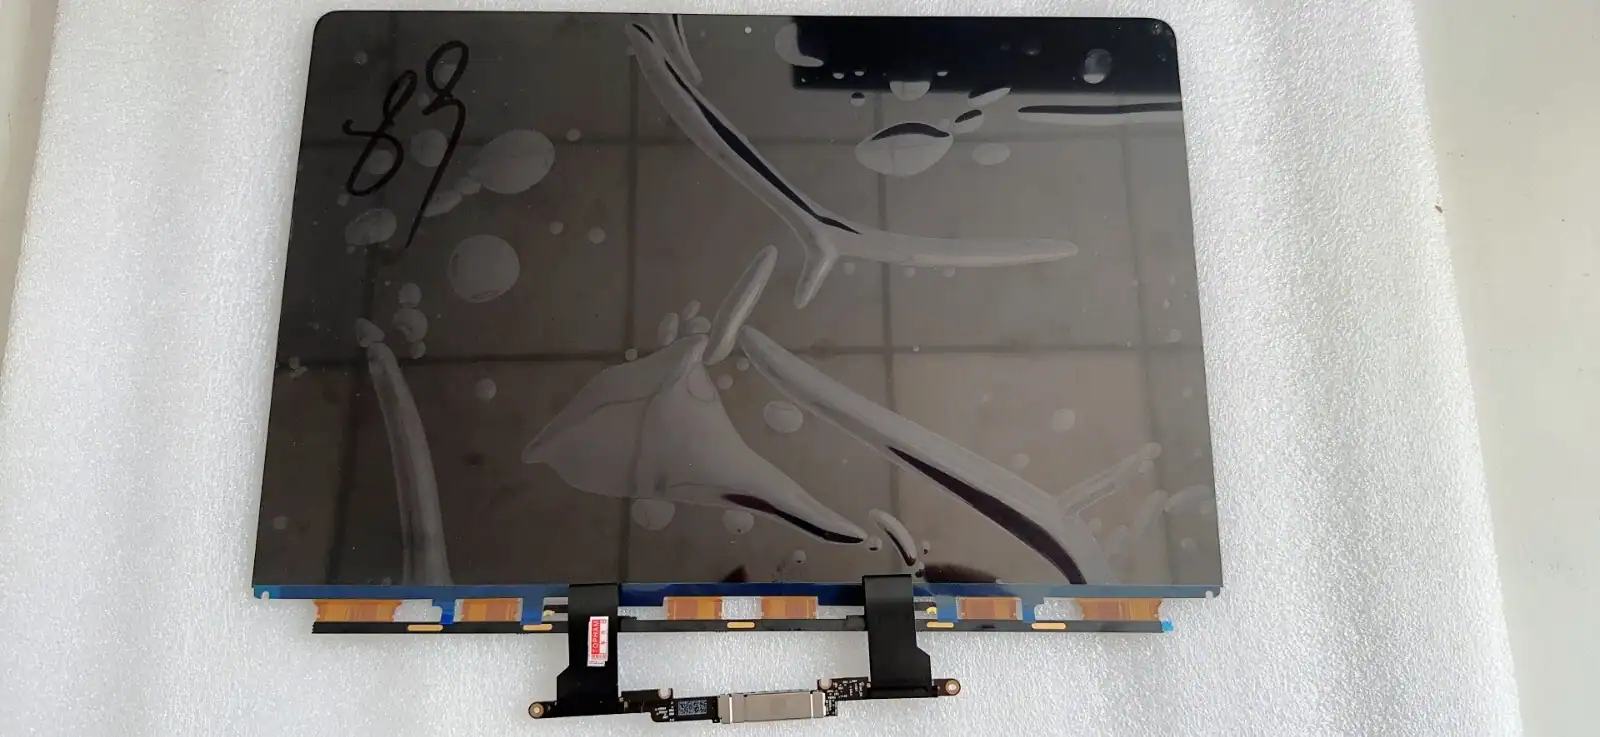
The Anatomy of a Display Replacement
A proper MacBook screen replacement isn’t just about swapping glass. Because of the unified design, technicians must replace the entire top clamshell assembly. This includes the aluminum casing, the Apple logo, the webcam, the hinges, and the ambient light sensors. Attempting to separate the LCD from the aluminum lid (a process known as “cell replacement”) is highly discouraged as it almost always results in backlight bleeding, dust behind the screen, and compromised structural integrity.
When selecting a repair facility, ensure they use high-quality, OEM-spec assemblies. A sub-par screen will drain your battery faster, exhibit poor color accuracy (ruining photo/video editing workflows), and lack the True Tone functionality that seamlessly adjusts screen temperature to your environment. If you need immediate assistance, book a screen diagnostic with our certified local technicians today.
Beyond the Glass: The Intricate World of MacBook Board Repair
While a shattered screen is visually obvious, the most complex and misunderstood aspect of Mac restoration happens out of sight. The logic board (Apple’s term for the motherboard) is the nervous system of your computer. It houses the CPU, GPU, RAM, SSD (storage), power management chips, and thousands of microscopic capacitors and resistors.
When an Authorized Service Provider diagnoses a dead Mac, their solution is almost universally a flat-rate logic board replacement. This approach is astronomically expensive and, crucially, it guarantees total data loss because modern Mac logic boards have the storage chips permanently soldered to them. This is where specialized macbook board repair—specifically component-level micro-soldering—becomes a lifesaver.
Symptoms of Logic Board Failure
How do you know if you need board repair rather than a simple part swap? Look out for these critical warning signs:
- Zero Power: The Mac is completely dead. No fan spin, no chime, no trackpad click, and the charger may not illuminate.
- The “Kernel Panic” Loop: Your Mac continually restarts on its own, often displaying a multi-lingual error message stating, “Your computer restarted because of a problem.”
- Liquid Damage: Even a few drops of water, tea, or wine can trigger a cascading failure across the board’s power rails.
- Missing Hardware: Wi-Fi suddenly says “Hardware not installed,” USB-C ports stop reading drives, or the battery shows an “X” despite being relatively new.
- SMC/T2/Apple Silicon Issues: The Mac turns on, but the fans run at maximum speed immediately, and the system is painfully slow (a protective mode triggered by a failed sensor on the board).
“Repairing a logic board isn’t about throwing parts at a problem; it’s an exercise in electrical forensics. We are hunting for a single short-circuited capacitor the size of a grain of sand on a board containing thousands of components.”
The Component-Level Repair Process: Micro-Soldering Explained
A true macbook board repair requires highly specialized equipment and an intimate understanding of electrical engineering. Organizations advocating for the Right to Repair have championed this component-level approach because it is economically and environmentally superior to replacing whole boards.
1. The Diagnostic Phase (Finding the Short)
Technicians begin by analyzing the board under a stereoscopic microscope. We look for visual cues: green corrosion (from liquid), exploded capacitors, or burned chips. Next, we use a digital multimeter to measure voltage drops and resistance on specific “power rails.” A power rail is a pathway that delivers a specific voltage (e.g., 5V, 3.3V, or the main power line, often around 12V-20V) to different parts of the board.
If a main power rail is shorted to ground, the Mac’s protective circuitry will prevent it from turning on to avoid a fire. Technicians may use thermal imaging cameras to inject a tiny, controlled voltage into the shorted line and watch for the failing component to glow red hot on the thermal screen.
2. The Micro-Soldering Operation
Once the culprit—perhaps a tiny ceramic capacitor—is identified, the micro-soldering begins. Using a precision hot air rework station and flux (a chemical agent that helps solder flow and prevents oxidation), the technician melts the solder holding the dead component in place. The damaged piece is removed with fine-tipped tweezers, the connection pads are cleaned and tinned with fresh leaded solder (which melts at a lower temperature and is more flexible than factory lead-free solder), and a donor component is grafted into place.
3. Ultrasonic Cleaning (The Liquid Damage Cure)
If the board suffered liquid damage, repairing the short isn’t enough. The microscopic minerals in the liquid will continue to corrode the board over time. To ensure a permanent fix, the entire logic board is placed into an industrial ultrasonic cleaner. Submerged in a specialized, heated chemical solvent, high-frequency sound waves create microscopic cavitation bubbles that scrub away hidden corrosion from underneath the densely packed BGA (Ball Grid Array) microchips.
Why You Shouldn’t Put Your Mac in Rice
It is the most persistent myth in tech: if you spill something on your electronics, put it in a bag of rice. Do not do this.
Rice is an incredibly inefficient desiccant. While it might absorb some superficial moisture on the casing, it will not pull moisture out from underneath the microchips on a logic board. Furthermore, the liquid itself isn’t the primary enemy—it’s the electricity running through the liquid. The moment liquid connects two conductive points on a powered logic board, it triggers galvanic corrosion, instantly eating away at metal contacts.
By putting your Mac in rice, you are simply allowing the corrosion to spread and harden while delaying actual, professional macbook board repair. If a spill occurs, turn the Mac off immediately, unplug it, do not try to turn it back on, and get it to a micro-soldering specialist as fast as possible.
Repair vs. Replace: Making the Smart Choice
When faced with a hefty repair quote, the inevitable question arises: “Should I fix it, or just buy a new one?”
Consider the total cost of ownership. A brand new MacBook Pro can cost anywhere from $1,500 to over $3,000. If an independent repair shop can perform a component-level macbook board repair for a fraction of that cost—restoring the machine to 100% functionality while preserving all your localized data, software licenses, and personalized settings—repair is overwhelmingly the logical choice.
Furthermore, repairing electronics is a critical step in combating the global e-waste crisis. By replacing a $2 capacitor instead of throwing away a 3-pound aluminum and lithium machine, you are contributing to a more sustainable technological ecosystem.
Conclusion
Whether you are dealing with a spiderweb of cracked glass and need a swift “Macbook screen replacement near me” to get back to work, or you’ve suffered a catastrophic liquid spill requiring intensive, microscopic macbook board repair, the solution requires expertise, precision, and the right tools.
Your MacBook is an investment in your creativity and productivity. Don’t write it off prematurely due to hardware failure. By partnering with skilled technicians who understand the intricate engineering of Apple’s hardware, you can revive your trusted machine, save your critical data, and ensure your digital life continues without missing a beat.